Sunflowers


The center is the first step in making a sunflower.  Here I have cut the large circle from the Wilton gumpaste set.  I insert a  6"-18 gauge wire and using my thumb I make a slight indentation in the top. This is left to dry.  When I am ready to assemble the flower, I paint the center with sugar glue and using sugar-tex, in brown,  I dust the surface to add the pollen.  Note that the indented center is a very dark brown.


This is a daisy wheel from F.M.M.  Roll out your gumpaste and place the paste ON the wheel.  Usually the paste is rolled out and then cut.  This cutter requires that the paste is placed over the wheel and then you roll the gumpaste rolling pin over the clay and it will cut.


Now you simply pull the remaining clay away from the wheel.  At this point you gently remove your large flower from the wheel,  thin your petals with a slight cupping. 


You can use any small petal cutter for the individual petals.  Cut and thin your petals then vein the petal before attaching it to the the cut base.  The first row of individual petals I glue directly to the base, however, the next two rows of petals are staggered to give a nice fullness.


This is the finished flower along with additional centers and a hydrangea needed for another cake.  I usually airbrush the the petals to give them a richer yellow color and if your center needs to be brightened you can do that as well.


Blackeyed Susan

Sugarveil is a great product for creating edible lace.  The two step process is quick and easy, yet adds an elegant finish to you cake design.

For this 90th Birthday cake I chose two silicone mats which create panels that  will be applied to the sides of the cake.


Sugarveil is a powdered product which is whipped for four minutes with 1/3 cup of boiling water.


Place a good size dollop on a prepared mat.  You may add gel color to the hot water if the whole batch is to be the same color, or you can dust or airbrush color after the lace has dried before you apply it to your cake.


Using a spatula, spread the mixture over the mat.


Next, using the spreader (which can be purchased from the Sugarveil company)  gently and evenly drag the surface from top to bottom.


Now set aside to dry.  This step can take up to 24 hours if it is humid.  Generally it take 2 -3 hours.  You may also speed the drying time by placing the mat in a 110 degree oven for 5-7 minutes.  If you dry in the oven,  make sure to cool the mat before attempting to remove the veil from the mat


The other mat used in this design.


To remove the lace from the mat, you turn the mat over so that the lace in under the mat.  Gentle pull the edges of the lace panel and using the spreader to hold the lace, you pull the mat from the lace.


Blackened Susan are done in the same manner as a shasta daisy.


The final design consisted of an 11" and 7" French Vanilla cake with strawberry compote.  The cake was frosted in yellow buttercream and the lace was applied ( I decided to use the one mat instead of both.  I will use the other on another cake).    A shell boarder finished off the edges and the flowers adorned the top and base.


Baseball Wedding


I am a sole proprietor,... but sometimes it take a village to bring a concept to fruition and this was one of those cakes. 

My client is the professional photographer for the Pittsburgh Pirates.  Dave was getting married to Jackie.  When they came in for a consult, Dave was giving me elements of the reception and said he had a man making baseball roses.  This gentlemen removes the cover of the ball and cuts the leather into petals to make roses.  Jackie wanted the cake to be an aqua blue/turquoise color with white filagree.  I took a few days and drew up a sketch of the cake I had in mind.  Dave loved the drawing, so I gave him a copy and I started planning.
First I ordered six 20" ball bats.  I only needed four, but just incase I cut wrong,  two extra where ordered.

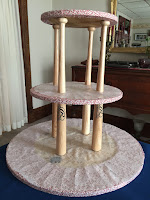
First my husband cut the bats above the blue band.  He also cut the cake boards needed from 1/4" sheet of plywood.  The bats are the "legs" or separators of the cake stand, the cake plates were the "boards".
The bats then needed to be drilling 1-1/4" into the center so that I could use a dowel to hold the bat and board together.  This task was an issue as the drill press we have was not high enough to get the bats under the bit.   I took the bats to Scott, the owner of a tool and die shop, and had them drilled.


Everything came together nicely.  The "boards" were then covered with a small baseball print material and then a plastic doily was cut to cover the material so that the frosting would not touch the material.

The Baseball Roses were the next step in this cake.  As I needed these roses to be a larger size than normal, I used a 1/4" styrofoam egg as the center.  I also used a large rose gumpaste petal cutter.

I found this wonderful tool at a local craft store.  It is for marking clay.  The kit contained a tool handle and three impression wheels.

Sugar flowers take many hours to create and this tool was a true time saver.  I took a small piece of craft foam and painted it with the red gel color, rolled the wheel through the color and then onto the gumpaste petal.


The centers were dried for a few days so that the large additional petals would be well supported when the rest of the flower was constructed.


I was so pleased with the final flowers.

A week or so before the wedding, Dave requested an additional sheet cake.  He wanted to feature a hand carved statue of Felix the Cat.  Dave also wanted the cake to be decorated like a quilt, as the bride  has a shop that does alternation and quilting.  A few days later Dave again contacts me and inquired as to whether or not it was possible for the sheet cake to have a lace train.  LACE..... oh that is definitely possible I said and with that I was ready to put all these element together for the final presentation.

The wedding cake was 16", 10" and 7" all Almond cake with Raspberry compote.  It was decorated in teal buttercream and pipped with with a white buttercream filagree using a No. 3 round tip.  


Look closely at the middle tier.  Dave brought three little statues of the Pittsburgh Pirates Mascot.


The Home plate was made of fondant and painted with the couples names


The very top of the cake featured a "Baseball" which was baked in the half ball muffin pan.  The ball was filled and then coated with a white whipped chocolate and then fondant.  The ball stitches where hand painted as they needed to be larger than my new tool would print.


I always make additional sugar flowers as I sometimes break them in the final process.  In this case, I used the extra to add to the tablescape.  


The lace is Sugarveil and I also added a train to the "bride" of the statue.   This sheet cake was half white cake with white chocolate mousse and half chocolate cake with chocolate mousse.  Too Cute!!

CrabFest 2015

A lovely women entertains every year with CRAB as the theme.  I'm not sure how long 
she has been hosting the annual event, as I have been doing the desserts for the past four years.

In the past three years,  she has had a number of sweets, all individual servings so that the guests could eat there or take a "sweet" home.  This year was the same, yet a little different.   CUPCAKES.... only.... she wanted them to be put into a large CRAB shape.


The hostess also requested candy seaweek, ocean waves, sand and seashells.  I cut fondant into strips and dried them on the backs of cardboard egg crates.  To finish them I airbrushed in shades of greens and blues.


My shell molds where purchased from First Impressions and are molded in fondant as well. I made them about a week prior to the party so they would dry and handle easily.

The CRAB was sketched on several pieces of newspaper that were taped together.  Once I was pleased with the drawing I then transferred the newspaper pieces to cardboard.


Claws


Crab body.


Using several layers of aluminum foil I shaped the foil around the cardboard to create a "pan".  I then put the cupcake papers in the pans.


The pans where then ready for cake batter. 


This allows the cupcakes to mold into the shape needed for the final design. Your guest simply pull the cupcake paper at the bottom and the cupcake breaks free of the design.


On site the table was covered with a deep blue tablecloth and skirt, as well as a clear plastic top runner so that none of the elements would damage the cloth.  I added a band of light blue foil under the plastic at one end as it was to be the "ocean".

I put the four sections of the Crab body together.  They were Chocolate cake with fudge filling, Coconut cake with cherry filling, Pineapple cake with pineapple filling and Lemon cake with lemon curd.


Here he is frosted in red buttercream and I am ready to airbrush in his detail.  The over all design contains 175 cupcakes.


This is the finished display.  The 30 on the sides was in celebration of her sons 30 birthday.


From the back, the detail is much more apparent in this picture as the sunlight was in front.  Table was carried out to its own tent for presentation.

Two Peas in a Pod

A couple expecting their first child...Twin Girls!!!


60 guest celebrated these little girls.  12" white cake and a 7" chocolate cake both with Raspberry compote filling.  The cakes were covered in mint green fondant and the "girls" are two peas in a pod.  Little white sweet pea flowers and a pink bow finished off the design.


The girls...


I too have twins (identical boys)..I know the joy and struggle that go along with raising multiples.  At the time of this post the girls have arrived 6 weeks early and after a short stay in the hospital NICU they are now home.  Emma and Emelia are BEAUTIFUL little peanuts, 4 pounds and growing.  
  Congratulations Bri and Matt!!! 

Football

OH Yes its Training Season....

Fans are avid about their sports teams.  

This is a cake for a group of friends who celebrate the start of the new season.

Its a 10" Marble cake with Chocolate custard.  Black and Gold buttercream on the sides.  The top is a coloring page that the Steelers put on the internet for kids.  I simply printed it with the Icing Image print system and airbrushed in the colors.

Good Luck Sports Fans...whatever your team may be!


Anima Goth


Katrina is the 18 year old granddaughter of a customer from many years ago.  Her Birthday cake was baked in the large book pan, one half was White cake with buttercream filling the other half was Chocolate cake with fudge filling.

The book binder is black fondant which I cut using the pan for size, before the cake was baked.  This allowed the binding to dry out.  Fondant will dry, but is very fragile as it does not have the elements of gumpaste or pastillage that make the clay hard. 

I first frosted the book cake with buttercream and then I placed it on the fondant binding so that the edges were clean and no frosting got on the binding.  Using a comb tool, comb the outer edges to create pages.  The loose leaf pages were done on wafer paper, hand painted and dampened to stick together.


Ivy


Ivy adds a very nice element to a sugar flower bouquet.  The green makes the flower colors pop, and the vines add a draping extension to the finished bouquet.

Ivy cutters can be purchased from the web and come in different shapes which also allow for a varied texture in your finished bouquet.  As natural ivy grows in a variety of green colors, you really can't make a mistake when dusting or painting.

Today I am working on a small english (solid green) spring ivy and a painted variegated ivy.   Simply cut your ivy from rolled gumapste, insert a 32 gauge wire and allow it to dry.  Dust or paint the leaf and tape five leaves together in a straight line.  This way they are easy to store for future use.  When needed gently pull the leave out to the left and right and bend the main wire down the middle to give a natural shape.  The long extended end of wire can now be taped into the bouquet.

The painted ivy gives a nice deep color with a variegated leaf.  When both types of ivy are present in a sugar bouquet.